
4. Configure first
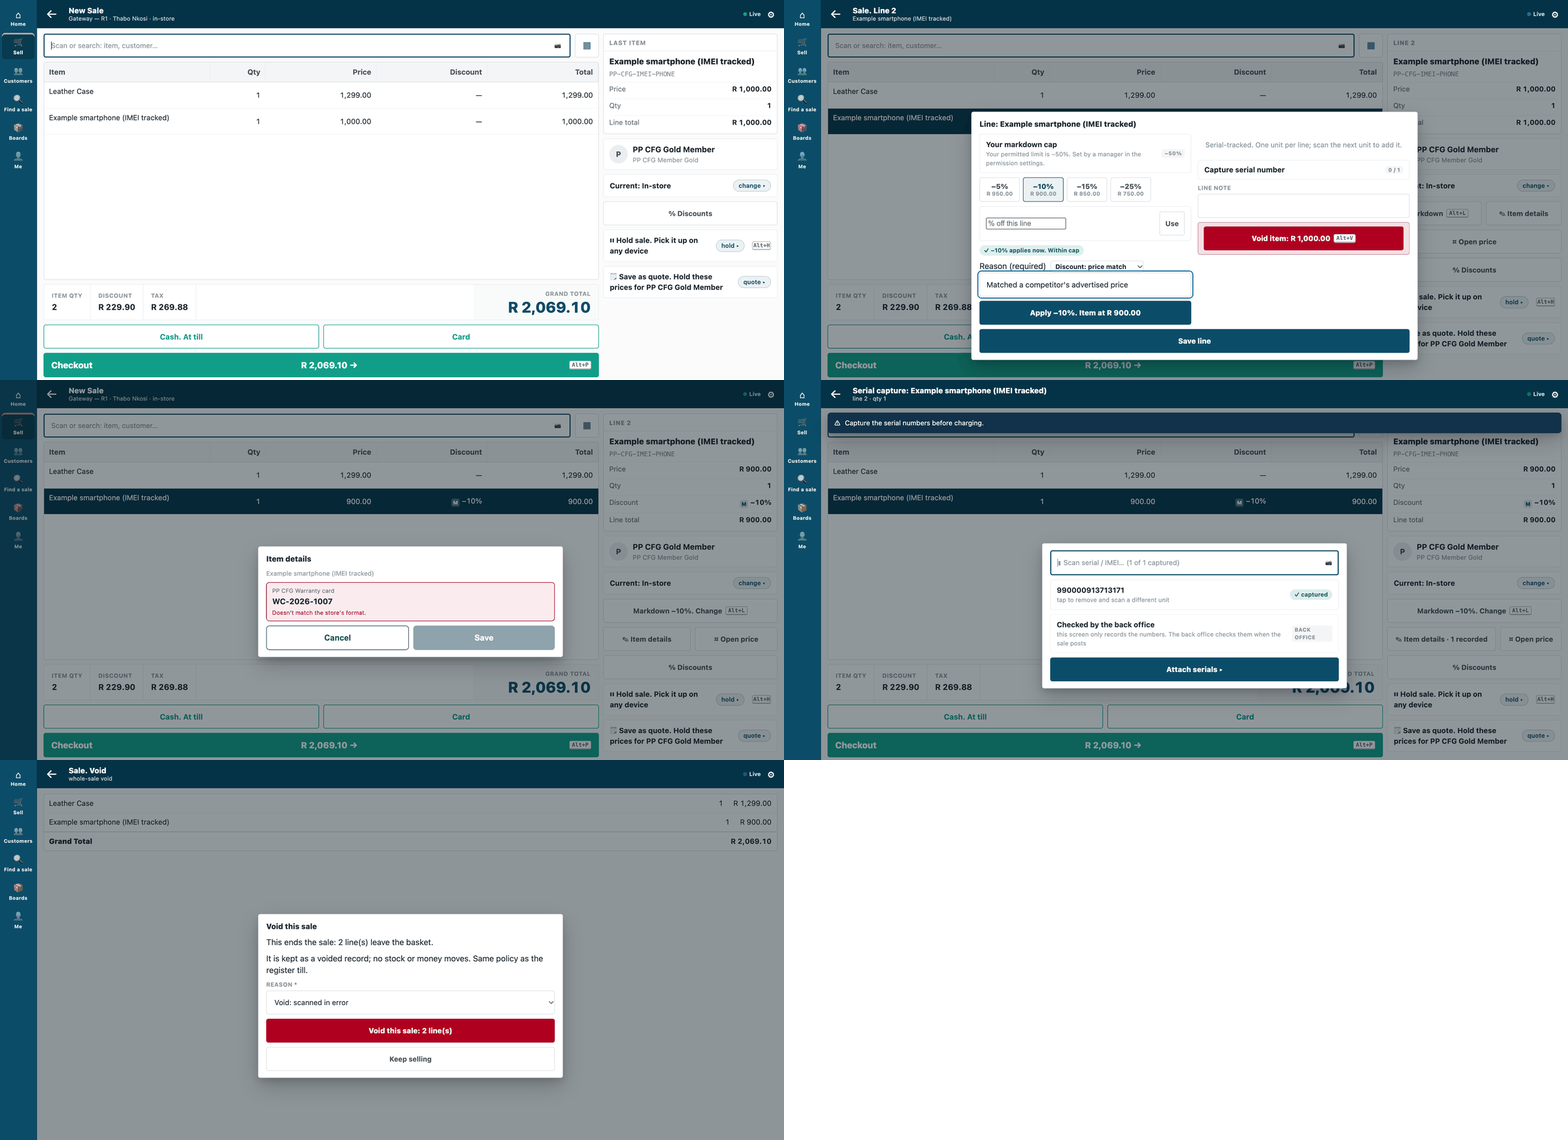
Settings only, no code: the till gives a member their price, asks for a reason on a markdown and on a void, checks a line detail, and asks for the phone's IMEI.
Most of what a shop asks for is already in iVendNext as a setting. This chapter shows how to set it up: the shop's administrator sets these in iVendNext Desk, or runs a one-time script, and nothing of yours runs in the shop. It is for every builder, before any code: most needs stop here.
Reference implementation: Setting a shop up with no code with the sample ../samples/s5_config_pack/ (coded reasons, IMEI tracking, one more detail per line, member pricing), and A receipt laid out for your market with ../samples/s4_receipt_pack/.
When to use it
Always first: rung 1 of the ladder (chapter 3, which lists everything that is configuration). Check this chapter and chapter 16 before you propose an app. This chapter teaches the five set-ups the kit has built and tested.
| You want | The shop's own setting |
|---|---|
| A coded reason when a cashier voids, returns or discounts | Reason Code Master rows, and the switch for that type in Retail Setting (a void reason also needs save_voided_transaction) |
| The IMEI of every phone sold, once | the item's Has Serial No; the IMEI is the serial number, received with the stock |
| One more detail on a line, for goods with no serial number | a Transaction Item Attribute (a name, a pattern, an order) |
| A member price | one Customer Group per tier, and one promotion per tier that applies to the sale and excludes every other group |
| A receipt for your market: tax number, address, logo, a line per VAT rate, a second language | a print format (chapter 7), then chosen on the till's POS Profile |
Steps: reasons, IMEI, line detail, member pricing
-
Copy
config.jsonand change the names, codes and numbers to the shop's. It is the whole set-up as data. ThePP CFGprefix is only there so the sample's test can find its records. -
Give the script a key of a user who may edit those records. System Manager, Retail Manager, Item Manager, Stock Manager and Sales Master Manager together are enough (measured). It is the administrator's key, used once.
-
Run it:
PP_BASE=https://your-shop PP_KEY=<api key> PP_SECRET=<api secret> python3 samples/s5_config_pack/apply_config.pyYou can run it twice: nothing doubles. Each run recomputes the member promotion's exclusion list, so if the shop adds a customer group later, run the script again and the new group is excluded.
--removeundoes it, except the stock: the item, its price, the unsold serial numbers and the booked Material Receipt stay. On a real shop use your own IMEIs and quantities. -
The shop needs a default Company. A sale of a serial-tracked item takes its company from it. Without one, the first IMEI sale fails with "Error: Value missing for Serial and Batch Bundle: Company".
-
Nothing to do at the till. The cashier is offered the reasons, asked for the IMEI, offered the line detail, and gets the member price once the member is attached to the sale. Each costs an extra step per line: switch on only what the shop will use.
Two limits to know before you rely on these settings:
- The till asks for the reason, but the server does not insist on one: a sale discount with no reason code still books.
- The line detail's pattern is checked on the till screen only. The server itself accepts a value that breaks it.
Steps: a receipt for your market
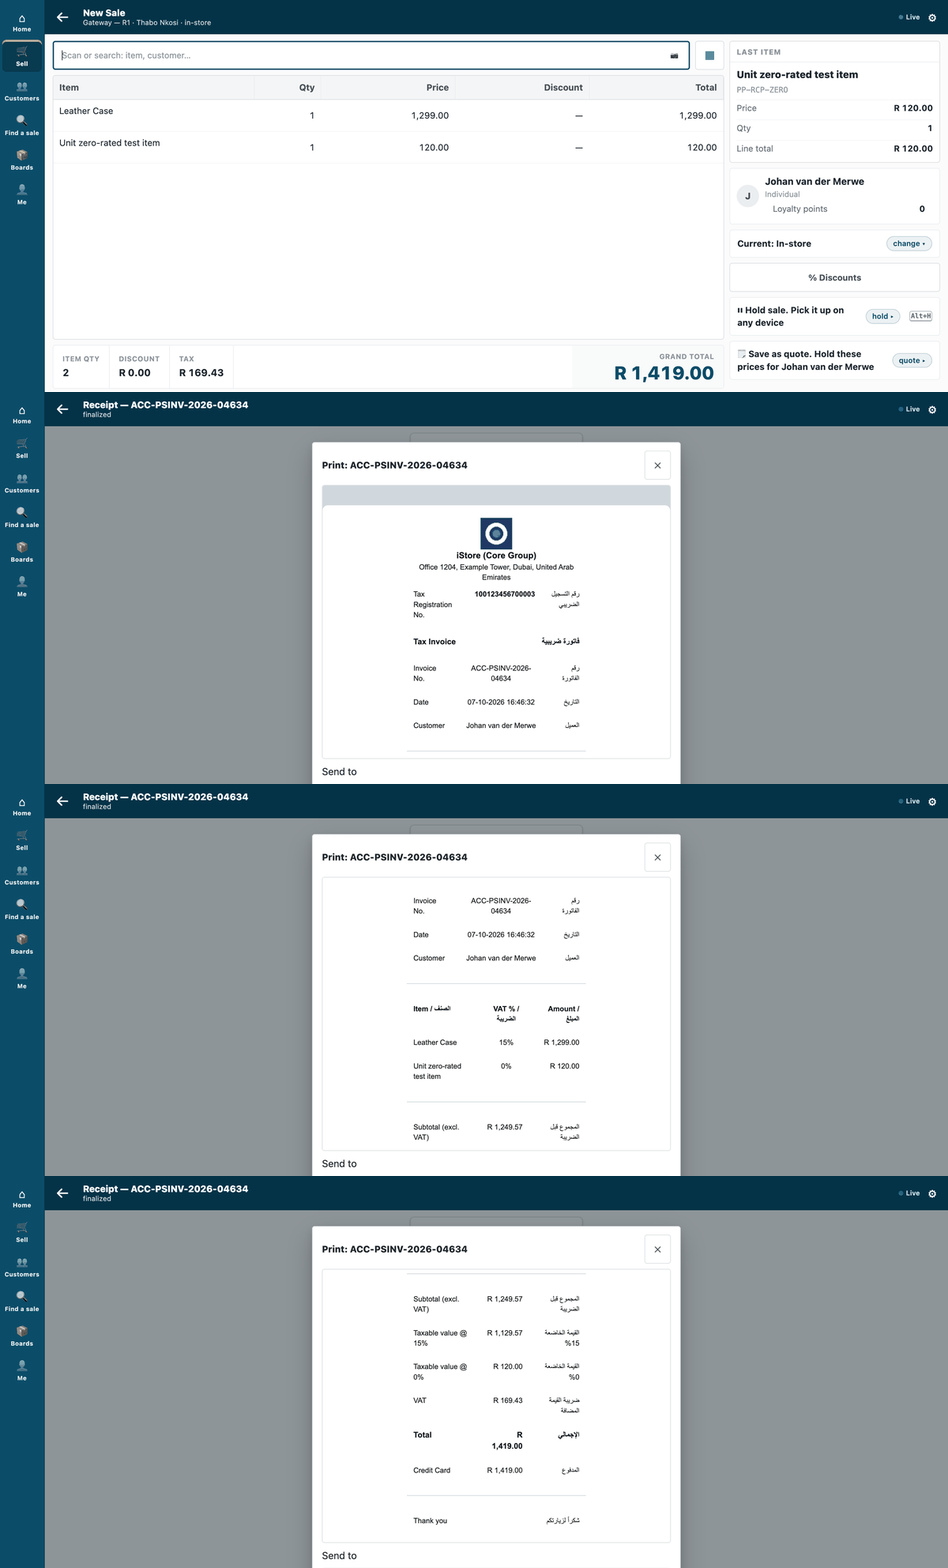
A sale at two VAT rates, then its tax invoice in the till's Print sheet: logo, address, tax number, each line's VAT rate and the taxable value per rate, in English beside Arabic.
-
Put the facts where the shop keeps them, not in the layout: the tax ID on the Company, and an Address linked to it. The sample reads them at print time, so one layout serves every company.
-
Copy
receipt.htmlandlogo.pngand edit the words, the order and the logo; the format's name starts with your prefix. VAT rates are read from each sale's own lines, never typed in, so a reprint should keep its old rate. Arabic sits beside English in a row marked right-to-left; the logo is written into the page. A script, a frame or an event attribute in a template is refused. -
Build and check, before anyone installs it:
python3 samples/s4_receipt_pack/build.py python3 tools/manifest/validate.py samples/s4_receipt_pack/manifest.json # VALID, exit 0 -
Install the manifest (chapter 7: today we run the installer for you).
-
Choose it on the till profile: Desk → POS Profile → the profile → Print Format → Save. This step is configuration; a manifest cannot do it yet. The till reads the format at each print, so it is live on the next receipt.
-
Book a sale and open the Print sheet to see it.
Limits to know before you ship a receipt:
- The format is for the till sale only; a back-office invoice has its own.
- Two different non-zero rates under one tax account print a single VAT total.
- Arabic on paper or PDF, a returned sale and a sale with two or more tax rows have not been tried; test them for your market.
What is refused, and why
- A price, tax or total set in code. Member pricing is a promotion, not a pricing rule: a selling pricing rule is refused today. A receipt prints money the shop has already worked out; it never decides it.
- A manifest that edits the shop's own settings or stock. That is why the set-up is a script run by the administrator, not a manifest.
- A field made required or hidden at the till, a QR code or fiscal mark on the receipt, labels printed from the till. These wait for extension points we are building (chapter 9; chapter 16 has the list). This chapter does not do them. (A wrong value refused on save is a save rule: chapter 9.)
- A customised receipt gets none of our later fixes, and the seeded receipt carries more than the sample (per-item charge rows, serial and batch lines, deposit and balance lines, offline-sale lines). Copy back what your market needs and test it.
When your service is down, and when the till is offline
No service of yours is involved: everything here lives in the shop, so there is nothing to be down. Offline has not been tried for any part of this chapter. One limit is known: an offline sale prints a provisional slip only; the final receipt format is for the booked sale.
Technical notes
The pictures
Both were walked on our test bench on 2026-10-07, iVendNext POS app at 8dc36aab8, in the till frame (/pos?frame=terminal, 1440 wide). The S5 walk ends with the sale voided, so nothing was sold. The S4 walk sent nothing to a printer; the test bench's currency is the Rand, so the invoice shows R where a UAE shop shows its own. Each sample's README has the stills, step by step.
What the kit has proven
- Read back from the shop's database: every switch, reason code, item, IMEI, line detail, group, member and promotion; the till's own reason list offers each reason.
- Member pricing: the same basket costs the member exactly 10% less (2 338.20 against 2 598.00) and the other customer full price; the booked sale equals the till's preview.
- Reasons: a sale discount keeps its type and code on the invoice; a line markdown keeps its type, code and the cashier's comment.
- IMEI: no IMEI, two units on one line, and one unit with two IMEIs are each refused in the till's words; a right sale books and takes the IMEI out of stock; the same IMEI cannot be sold twice.
- Run twice, then removed: the second run creates nothing; after
--removenothing live is left (a record a booked sale points at is retired, and a later run switches it back on). - The receipt, on three sales (standard-rated, zero-rated, both): logo, company name, tax number, address, English and Arabic labels, right-to-left, each item's booked VAT rate, taxable value per rate, and Total and VAT equal to the booked figures. Uninstall then reinstall leaves the schema as found. With either pack applied, preview equalled booking on every basket (chapter 14).
What it has not
- The till screens, partly: the 2026-10-07 walk (row SHOTS2, hold 3, run
pp-20261007T110827Z-35077) showed the till asking for a markdown reason and its comment, the IMEI, and a void reason, and voiding the sale with its record kept. The return reasons (item return, sale return) were not walked, and the voided record's stored reason was not read back from the database. - A reason is not required by the server: a sale discount with no reason code booked and matched. An item-return or sale-return reason on a sale was not exercised.
- The line detail's pattern is checked on the till screen only; the server saved a value that broke it.
- Receipts: Arabic shaping and right-to-left order on paper or PDF; a 5% VAT shop in dirhams (the test shop is rand at 15%); a real item surcharge; a returned sale; a sale with two or more tax rows (the template's branch for it was not run); the Customer TRN, DUPLICATE and Discount rows and a serial under an item were never rendered. Two different non-zero rates under one tax account print a single VAT total. The format is for the till sale only; a back-office invoice has its own.
- A reprint keeping its old VAT rate (step 2 of the receipt) was not tested.
- A customer group added after the member promotion is covered by re-running the script; that recompute was not exercised with a second group.
- Offline was not tested for any part of this chapter.
- Blind counts, permissions per till action, gift receipts and notifications with the print attached have no recipe in the kit yet.
See also
3. The ladder and the four rules · 7. Manifests · 9. The extension-point catalogue and requests · 14. Testing and release · 16. Possible, not possible, limits